Obligatory Workbench Page


R
ecently in the course of this proto-galoot's progress it became necessary to shut up and actually make a bench to wreck wood.  I've built several general usage benches but the only criteria was sturdiness.  A woodworking bench is specialized and has a primary purpose: hold a piece of wood still.  Since I hadn't done much woodworking with hand tools, it was hard to guess what features should be designed in while trying to anticipate future improvements.  Each bench is unique and people much smarter than I have published their plans; the well of information is deep and rather intimidating. 

I'd lie awake at night thinking about this joint or that length, the sequence of manufacture and assembly.  It's said that the great inventor Nikola Tesla would work up an extremely elaborate design (like a dynamo) in his head until he was satisfied, then draw it out and have it built.  Always worked the first time.  Well, I ain't no Tesla.  In three pages of sketches and notes, I've modified them as construction progressed (use pencil).  While the top was being glued up (which took over 10 days), I started on the legs.  Doubt jumped in--this isn't big enough!  Check the sketch, it's good, I hadn't yet grasped the scale.  Trust your notes and keep them current during the process so you too can make an obligatory Bench Page.

While I'd imagined using only hand tools, kinda like an apprentice's final project, electrons were sacrificed for a few reasons.  If I feel like justifying myself, you'll read (in no particular order) that "fast" was one of my criteria.  A first bench implies none other before it.  When that is true, certain mechanics of hand tooling are near impossible.  Thirdly, my hand working skills were so undeveloped that I decided it more important to build a solid foundation to refine those skills than to build a piece of crap bench.  Fourthly, I lack some hand tools necessary, namely a mortising chisel and a good crosscut saw (really).

Surely, I will expend more sweat on the next bench, but no more care.


The Particulars

Top: laminated 2x4 fir (kiln-dried) approx. 5' long and 18-1/2" deep (excluding tool tray).  Base: doubled-up 2x4 fir legs and 4x4 stretchers secured by Veritas bench bolts.  Height: 33"  Apron: 1x4 hard maple on three sides.  Finish: Shellac & Orange Wax.

Front vise is a Record 52-1/2 and the end vise is a Veritas regular size "front" jobber with an 8/4 hard maple movable jaw.  Dog holes are 3/4" round drilled perpendicular to accommodate Veritas round brass bench dogs (which feature a 2 degree bevel).

Tool tray is constructed of 3/4" birch plywood and top edges are capped with 1/8" maple (to hide the plys).


Lessons Learned & Mistakes Made

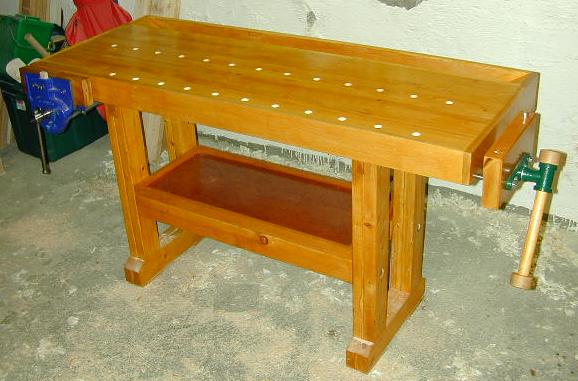
Joint 2x4s before glue-up to reduce gaps in the top.  Gaps can be filled with a wood filler (I used Elmer's), it blends in well and took shellac.

Leave ends long and cut after slab is constructed.  I didn't do this and had to resort to a belt sander to flatten off the ends which was murder on my back.

After flattening, the top slab will finish out to approx. 3-1/8" thick (from the original 3-1/2").  The thin bit of wood left above the front vise's fixed jaw became too thin and I had to cut it out entirely and patch with a piece of maple.

Once slab is glued up & flattened, make sides square & plumb especially where the apron will act as a vise face.  Do this before measuring and cutting for the vise/s.

Triple check the vise mounts.  It's easier to chisel out pine/fir than the hard maple apron.

Pre-tap vise mounting screw holes when the slab is upside down.  Use liquid soap or bee's wax on threads.

The loose pins in the feet make moving the bench a little difficult.  Can't lift too high or they'll fall out, you gotta drag the bench.  No biggie.

Do not make the tool tray out of 1/2" ply--it's not strong enough. 

A 3/4" apron feels a little thin.  Since the bottom edge of the apron hangs below the surface of the 2x4 slab, doubling up the material would yield a nicer 1-1/2" edge.  I did glue strips of maple behind the bottom edges of the front apron and tool tray back to provide extra clamping surface.

The tool tray was initially designed to be removable in case I didn't want it or to prevent damage in the event the bench is broken-down and loaded into a moving van.  Pretty sure I'll keep it now and it could be braced for a move.  In retrospect, it would look nicer to have cut the two side aprons long enough to comprise the ends of the tool tray instead of having a break between end of the slab and the plywood tool tray.  But the tool tray is deeper than the apron so that would be another cut.  I chose to make the apron 3-1/2" (vertical) based on how it landed on the front vise.  Now, it's short of the screw and guide rods by 1/2".  A uniform width apron across the sides would be as deep as the tray and since it would land in the middle of the vise screw, would have to be extended another inch or so just to not look stupid.  At that point there is a fair amount of unsupported apron below the bottom of the slab.  Probably okay if the apron were 1-1/2" thick, and/or the slab was made of 2x6s. 

Tool tray was made deep enough to bury a block plane.  I'd like it to be a little wider so my big hands can grab something w/o barking my knuckles.

Before drilling the dog holes, use pennies to get a feel for the spacing.  This actually took longer than expected to work around the legs.  I knew I wanted a hole to line up with the dog in the front vise and worked my way over to the end vise.  4-1/8" o.c. is what worked out.

The caps on the handle of the end vise are from a thrift-store rolling pin.


Plans
[to follow]


Finally
This bench would've never happened had it not been for the incredible support from the oldtools list.  Years ago, after finding a Stanley #4 metal bench plane at a thrift store and doing a little googling, I crawled onto the porch.  A more friendly & knowledgeable group of like-minded folks you'll not find on the net.

And while I've been educating myself and gathering older tools since then, the completion of this bench is a milestone.  It took 3 months to design and build, but more importantly, it's a jumping-off point. 


[ Home ]